
作者:厦门大学计算机系林子雨副教授
说明:本博客是与林子雨编著《数据采集与预处理》教材配套的教学资料。
版权声明:本博客内容,未经同意,禁止转载。
操作系统:Windows10
Flume:1.9.0
一、方案设计
设置三个Agent,即Agent1、Agent2和Agent3,三者的组件配置如下(如图1所示):
(1)Agent1: Exec Source + Memory Channel + Avro Sink
(2)Agent2: NetCat Source + Memory Channel + Avro Sink
(3)Agent3: Avro Source + Memory Channel + Logger Sink
在Agent1中,各个组件的功能如下:
(1)Exec Source:实施监控一个文件的内容是否有增加;
(2)Avro Sink:用于跨节点传输,把捕捉到的数据传递给Agent3。
在Agent2中,各个组件的功能如下:
(1)NetCat Source:接收来自Telnet的数据;
(2)Avro Sink:用于跨节点传输,把捕捉到的数据传递给Agent3。
在Agent3中,各个组件的功能如下:
(1)Avro Source:接收来自Agent1和Agent2的数据;
(2)Logger Sink:把数据输出到控制台。
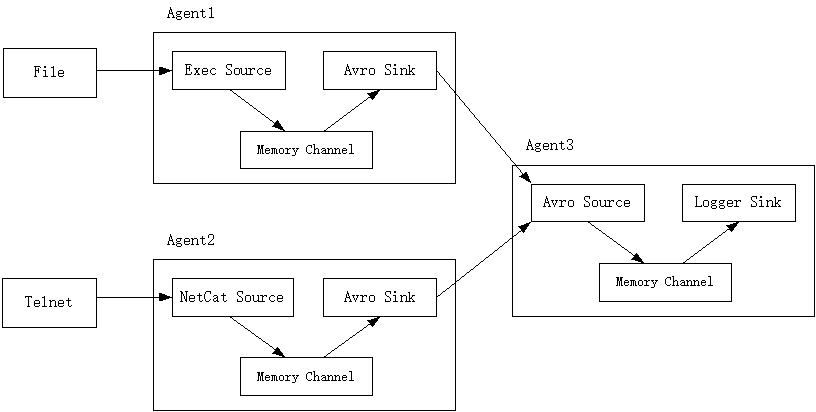
图1 方案设计
二、配置Flume
为Agent1创建一个配置文件multi-agent1.conf,其内容如下:
# 设置各个组件名称
a1.sources = r1
a1.sinks = k1
a1.channels = c1

# 配置Source
a1.sources.r1.type = exec
a1.sources.r1.command = tail -f C:/apache-flume-1.9.0-bin/data.txt

# 配置Sink
a1.sinks.k1.type = avro
a1.sinks.k1.hostname = localhost
a1.sinks.k1.port = 4141

# 配置Channel
a1.channels.c1.type = memory
a1.channels.c1.capacity = 1000
a1.channels.c1.transactionCapacity = 100

# 把Source和Sink绑定到Channel
a1.sources.r1.channels = c1
a1.sinks.k1.channel = c1
为Agent2创建一个配置文件multi-agent2.conf,其内容如下:
# 设置各个组件名称
a2.sources = r1
a2.sinks = k1
a2.channels = c1

# 配置Source
a2.sources.r1.type = netcat
a2.sources.r1.bind = localhost
a2.sources.r1.port = 44444

# 配置Sink
a2.sinks.k1.type = avro
a2.sinks.k1.hostname = localhost
a2.sinks.k1.port = 4141

# 配置Channel
a2.channels.c1.type = memory
a2.channels.c1.capacity = 1000
a2.channels.c1.transactionCapacity = 1000

# 把Source和Sink绑定到Channel
a2.sources.r1.channels = c1
a2.sinks.k1.channel = c1
为Agent3创建一个配置文件multi-agent3.conf,其内容如下:
# 设置各个组件名称
a3.sources = r1
a3.sinks = k1
a3.channels = c1

# 配置Source
a3.sources.r1.type = avro
a3.sources.r1.bind = localhost
a3.sources.r1.port = 4141

# 配置Sink
a3.sinks.k1.type = logger

# 配置Channel
a3.channels.c1.type = memory
a3.channels.c1.capacity = 1000
a3.channels.c1.transactionCapacity = 100

# 把Source和Sink绑定到Channel
a3.sources.r1.channels = c1
a3.sinks.k1.channel = c1
三、执行过程
先启动Agent3,再启动Agent2,最后启动Agent1,如果顺序不对,会出现拒绝连接的情况。
新建一个cmd窗口,执行如下命令启动Agent3:
> cd c:\apache-flume-1.9.0-bin
> .\bin\flume-ng.cmd agent --conf ./conf --conf-file ./conf/multi-agent3.conf --name a3 -property flume.root.logger=INFO,console
新建一个cmd窗口,执行如下命令启动Agent2:
> cd c:\apache-flume-1.9.0-bin
> .\bin\flume-ng.cmd agent --conf ./conf --conf-file ./conf/multi-agent2.conf --name a2 -property flume.root.logger=INFO,console
新建一个cmd窗口,执行如下命令启动Agent1:
> cd c:\apache-flume-1.9.0-bin
> .\bin\flume-ng.cmd agent --conf ./conf --conf-file ./conf/multi-agent1.conf --name a1 -property flume.root.logger=INFO,console
新建一个cmd窗口,在里面执行如下命令向data.txt文件中追加内容:
> echo spark >> "C:\apache-flume-1.9.0-bin\data.txt"
> echo hadoop >> "C:\apache-flume-1.9.0-bin\data.txt"
> echo flume >> "C:\apache-flume-1.9.0-bin\data.txt"
新建一个cmd窗口(记作“Telnet窗口”),在里面执行如下命令:
> telnet localhost 44444在Telnet窗口内输入如下内容:
i love spark
i love hadoop
i love flume
这时,在Agent3的cmd窗口内,就可以看到控制台输出的数据(如图2所示)。
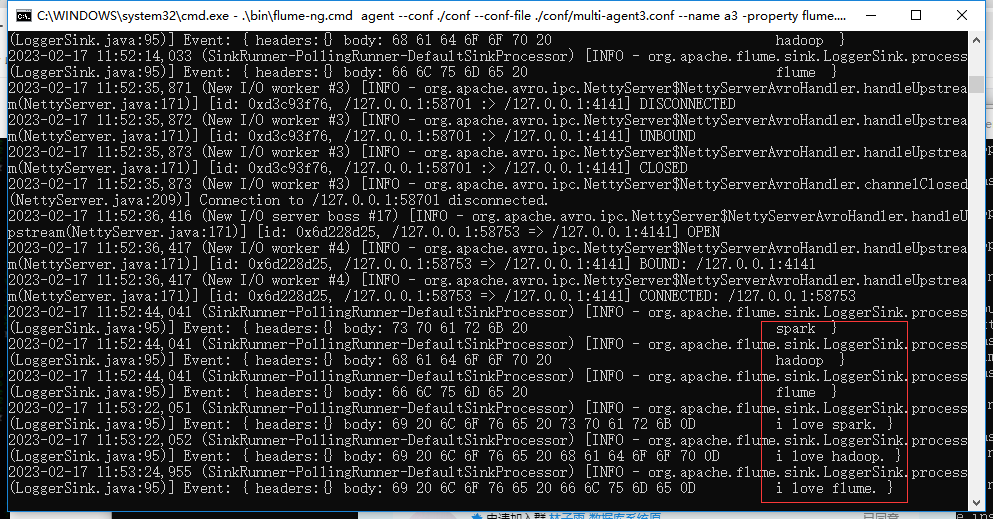
图2 控制台输出的数据