
【版权声明】版权所有,请勿转载!
【相关文章推荐】《大数据软件安装和基础编程实践指南》,详细指导VMWare、Ubuntu、Hadoop、HDFS、HBase、Hive、MapReduce、Spark、Flink的安装和基础编程
作者:厦门大学计算机系林子雨副教授
E-mail: ziyulin@xmu.edu.cn
本博客内容与林子雨编著《大数据技术原理与应用(第4版)》(访问教材官网)教材配套。
Flink是Apache软件基金会的一个顶级项目,是为分布式、高性能、随时可用以及准确的流处理应用程序打造的开源流处理框架,并且可以同时支持实时计算和批量计算。Flink起源于Stratosphere 项目,该项目是在2010年到2014年间由柏林工业大学、柏林洪堡大学和哈索普拉特纳研究所联合开展的。2014年4月,Stratosphere代码被贡献给Apache软件基金会,成为Apache软件基金会孵化器项目。之后,团队的大部分创始成员离开大学,共同创办了一家名为Data Artisans的公司。在项目孵化期间,为了避免与另外一个项目发生重名,Stratosphere被重新命名为Flink。在德语中,Flink是“快速和灵巧”的意思,使用这个词作为项目名称,可以彰显流计算框架的速度快和灵活性强的特点。
本教程首先介绍Flink的安装,然后以WordCount程序为实例来介绍Flink编程方法。
一. 安装Flink
Flink的运行需要Java环境的支持,因此,在安装Flink之前,请先参照相关资料安装Java环境(比如Java8)。然后,到Flink官网下载安装包,比如下载得到的安装文件为flink-1.16.2-bin-scala_2.12.tgz,并且保存在Linux系统中(假设当前使用hadoop用户名登录了Linux系统,并且安装文件被保存到了“/home/hadoop/Downloads”目录下)。
也可以直接点击这里从百度云盘下载软件(提取码:ziyu)。进入百度网盘后,进入“软件”目录,找到flink-1.16.2-bin-scala_2.12.tgz文件,下载到本地。
然后,使用如下命令对安装文件进行解压缩:
cd /home/hadoop/Downloads
sudo tar -zxvf flink-1.16.2-bin-scala_2.12.tgz -C /usr/local
修改目录名称,并设置权限,命令如下:
cd /usr/local
sudo mv ./ flink-1.16.2 ./flink
sudo chown -R hadoop:hadoop ./flink
Flink对于本地模式是开箱即用的,如果要修改Java运行环境,可以修改“/usr/local/flink/conf/flink-conf.yaml”文件中的env.java.home参数,设置为本地Java的绝对路径。
使用如下命令添加环境变量:
vim ~/.bashrc在.bashrc文件中添加如下内容:
export FLINK_HOME=/usr/local/flink
export PATH=$FLINK_HOME/bin:$PATH
保存并退出.bashrc文件,然后执行如下命令让配置文件生效:
source ~/.bashrc使用如下命令启动Flink:
cd /usr/local/flink
./bin/start-cluster.sh
使用jps命令查看进程:
$ jps
8660 TaskManagerRunner
9333 Jps
8383 StandaloneSessionClusterEntrypoint
如果能够看到TaskManagerRunner和StandaloneSessionClusterEntrypoint这两个进程,就说明启动成功。
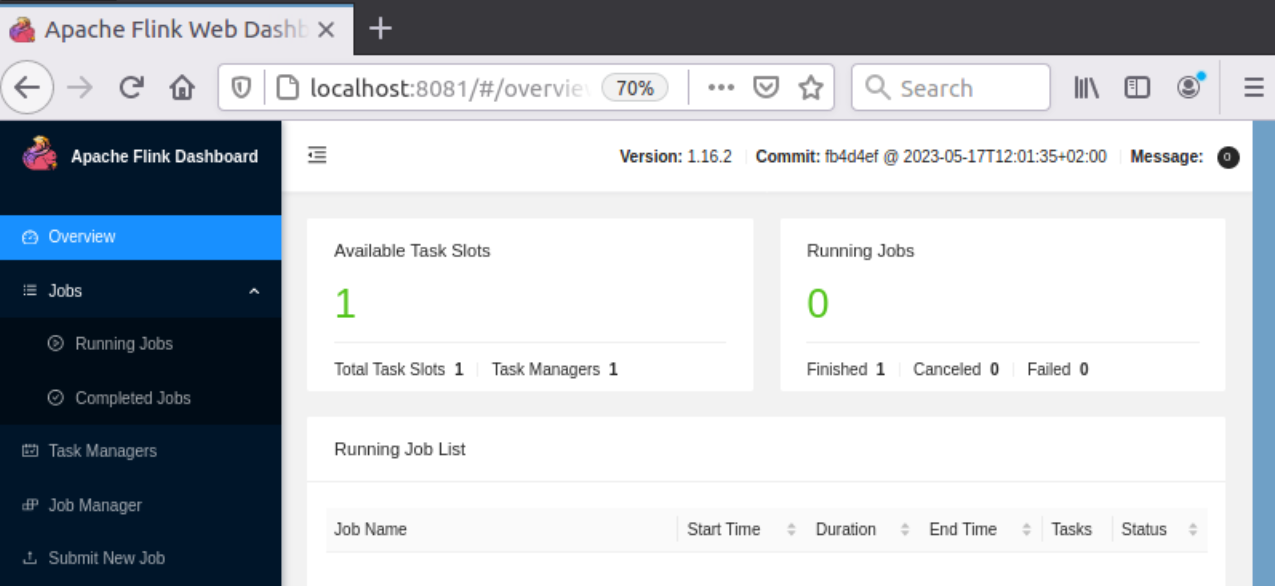
Flink的JobManager同时会在8081端口上启动一个Web前端,可以在浏览器中输入“http://localhost:8081”来访问。 网页效果如下图所示:
Flink安装包中自带了测试样例,这里可以运行WordCount样例程序来测试Flink的运行效果,具体命令如下:
cd /usr/local/flink/bin
./flink run /usr/local/flink/examples/batch/WordCount.jar
执行上述命令以后,如果执行成功,应该可以看到类似如下的屏幕信息:
Starting execution of program
Executing WordCount example with default input data set.
Use --input to specify file input.
Printing result to stdout. Use --output to specify output path.
(a,5)
(action,1)
(after,1)
(against,1)
(all,2)
……
二. 编程实现WordCount程序
编写WordCount程序主要包括以下几个步骤:
(1)安装Maven
(2)编写代码
(3)使用Maven打包Java程序
(4)通过flink run命令运行程序
1. 安装Maven
Ubuntu中没有自带安装maven,需要手动安装maven。可以访问maven官方下载自己下载。这里直接给出apache-maven-3.9.2-bin.zip的下载地址,直接点击下载即可。或者也可以点击这里从百度网盘下载文件(提取码是ziyu,进入百度网盘后,在“软件”目录下找到Maven安装文件)。
这里选择安装在/usr/local/maven目录中:
sudo unzip ~/Downloads/apache-maven-3.9.2-bin.zip -d /usr/local
cd /usr/local
sudo mv apache-maven-3.9.2/ ./maven
sudo chown -R hadoop ./maven
2. 编写代码
在Linux终端中执行如下命令,在用户主文件夹下创建一个文件夹flinkapp作为应用程序根目录:
cd ~ #进入用户主文件夹
mkdir -p ./flinkapp/src/main/java
然后,使用vim编辑器在“./flinkapp/src/main/java”目录下建立三个代码文件,即WordCountData.java、WordCountTokenizer.java和WordCount.java。
WordCountData.java用于提供原始数据,其内容如下:
package cn.edu.xmu;
import org.apache.flink.streaming.api.datastream.DataStream;
import org.apache.flink.streaming.api.environment.StreamExecutionEnvironment;

public class WordCountData {
    public static final String[] WORDS=new String[]{"To be, or not to be,--that is the question:--", "Whether \'tis nobler in the mind to suffer", "The slings and arrows of outrageous fortune", "Or to take arms against a sea of troubles,", "And by opposing end them?--To die,--to sleep,--", "No more; and by a sleep to say we end", "The heartache, and the thousand natural shocks", "That flesh is heir to,--\'tis a consummation", "Devoutly to be wish\'d. To die,--to sleep;--", "To sleep! perchance to dream:--ay, there\'s the rub;", "For in that sleep of death what dreams may come,", "When we have shuffled off this mortal coil,", "Must give us pause: there\'s the respect", "That makes calamity of so long life;", "For who would bear the whips and scorns of time,", "The oppressor\'s wrong, the proud man\'s contumely,", "The pangs of despis\'d love, the law\'s delay,", "The insolence of office, and the spurns", "That patient merit of the unworthy takes,", "When he himself might his quietus make", "With a bare bodkin? who would these fardels bear,", "To grunt and sweat under a weary life,", "But that the dread of something after death,--", "The undiscover\'d country, from whose bourn", "No traveller returns,--puzzles the will,", "And makes us rather bear those ills we have", "Than fly to others that we know not of?", "Thus conscience does make cowards of us all;", "And thus the native hue of resolution", "Is sicklied o\'er with the pale cast of thought;", "And enterprises of great pith and moment,", "With this regard, their currents turn awry,", "And lose the name of action.--Soft you now!", "The fair Ophelia!--Nymph, in thy orisons", "Be all my sins remember\'d."};
    public WordCountData() {
    }
    public static DataStream<String> getDefaultTextLineDataStream(StreamExecutionEnvironment senv){
        return senv.fromElements(WORDS);
    }
}
WordCountTokenizer.java用于切分句子,其内容如下:
package cn.edu.xmu;
import org.apache.flink.api.common.functions.FlatMapFunction;
import org.apache.flink.api.java.tuple.Tuple2;
import org.apache.flink.util.Collector;

public class WordCountTokenizer implements FlatMapFunction<String, Tuple2<String,Integer>>{
    public WordCountTokenizer(){}
    public void flatMap(String value, Collector<Tuple2<String, Integer>> out) throws Exception {
        String[] tokens = value.toLowerCase().split("\\W+");
        int len = tokens.length;
        for(int i = 0; i<len;i++){
            String tmp = tokens[i];
            if(tmp.length()>0){
                out.collect(new Tuple2<String, Integer>(tmp,Integer.valueOf(1)));
            }
        }
    }
}
WordCount.java提供主函数,其内容如下:
package cn.edu.xmu;
import org.apache.flink.api.common.RuntimeExecutionMode;
import org.apache.flink.api.java.tuple.Tuple2;
import org.apache.flink.streaming.api.datastream.DataStream;
import org.apache.flink.streaming.api.environment.StreamExecutionEnvironment;

public class WordCount {
    public WordCount(){}
    public static void main(String[] args) throws Exception {
        StreamExecutionEnvironment senv = StreamExecutionEnvironment.getExecutionEnvironment();
        senv.setRuntimeMode(RuntimeExecutionMode.BATCH);
        Object text;
        text = WordCountData.getDefaultTextLineDataStream(senv);
        DataStream<Tuple2<String, Integer>> counts = ((DataStream<String>)text).flatMap(new WordCountTokenizer())
                .keyBy(0)
                .sum(1);
        counts.print();
        senv.execute();
    }
}
该程序依赖Flink Java API,因此,我们需要通过Maven进行编译打包。需要新建文件pom.xml,然后,在pom.xml文件中添加如下内容,用来声明该独立应用程序的信息以及与Flink的依赖关系:
<project>
  <groupId>cn.edu.xmu.dblab</groupId>
  <artifactId>wordcount</artifactId>
  <modelVersion>4.0.0</modelVersion>
  <name>WordCount</name>
  <packaging>jar</packaging>
  <version>1.0</version>
  <repositories>
    <repository>
      <id>alimaven</id>
      <name>aliyun maven</name>
      <url>https://maven.aliyun.com/nexus/content/groups/public/</url>
    </repository>
  </repositories>
  <dependencies>
    <dependency>
      <groupId>org.apache.flink</groupId>
      <artifactId>flink-streaming-java</artifactId>
      <version>1.16.2</version>
    </dependency>
    <dependency>
      <groupId>org.apache.flink</groupId>
      <artifactId>flink-clients</artifactId>
      <version>1.16.2</version>
    </dependency>
    <dependency>
      <groupId>org.apache.flink</groupId>
      <artifactId>flink-java</artifactId>
      <version>1.16.2</version>
    </dependency>
  </dependencies>
</project>
3.使用Maven打包Java程序
为了保证Maven能够正常运行,先执行如下命令检查整个应用程序的文件结构:
cd ~/flinkapp
find .
文件结构应该是类似如下的内容:
.
./src
./src/main
./src/main/java
./src/main/java/WordCountData.java
./src/main/java/WordCount.java
./src/main/java/WordCountTokenizer.java
./pom.xml
接下来,我们可以通过如下代码将整个应用程序打包成JAR包(注意:计算机需要保持连接网络的状态,而且首次运行打包命令时,Maven会自动下载依赖包,需要消耗几分钟的时间):
cd ~/flinkapp    #一定把这个目录设置为当前目录
/usr/local/maven/bin/mvn package
如果屏幕返回的信息中包含“BUILD SUCCESS”,则说明生成JAR包成功。
4.通过flink run命令运行程序
最后,可以将生成的JAR包通过flink run命令提交到Flink中运行(请确认已经启动Flink),命令如下:
/usr/local/flink/bin/flink run --class cn.edu.xmu.WordCount ~/flinkapp/target/wordcount-1.0.jar执行成功后,可以在屏幕上看到如下图所示结果:

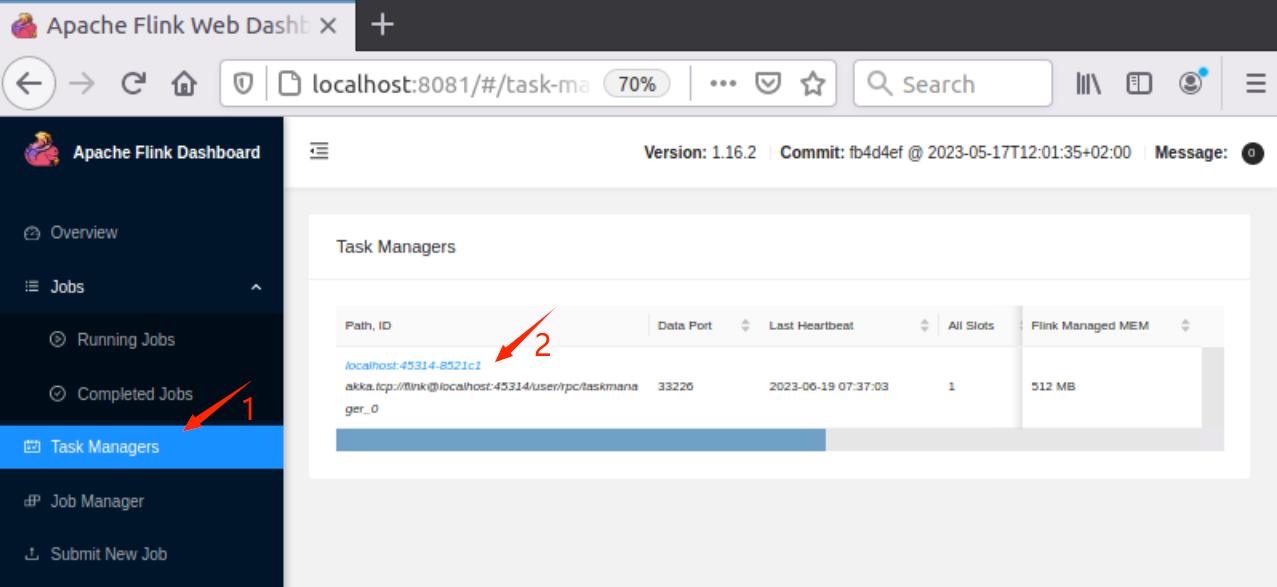
这时可以到浏览器中查看词频统计结果。在Linux系统中打开一个浏览器,在里面输入“http://localhost:8081”,进入Flink的WEB管理页面,然后,点击左侧的“Task Managers”,会弹出右边的新页面,在页面中点击“Path,ID”下面的链接(如下图所示)。
然后,会出现如图10-4所示的新页面,在这个页面中,点击“Stdout”选项卡,就可以看到词频统计结果了。

三、使用IntelliJ IDEA开发调试WordCount程序
请参考相关网络资料完成IntelliJ IDEA的安装。
在开始本实验之前,首先要启动Flink。
下面介绍如何使用IntelliJ IDEA工具开发WordCount程序。
在Linux系统中安装IntelliJ IDEA,然后使用IntelliJ IDEA工具开发WordCount程序,并打包成JAR文件,提交到Flink中运行。
请参考相关网络资料完成IntelliJ IDEA的安装。在开始本实验之前,首先要启动Flink。下面介绍如何使用IntelliJ IDEA工具开发WordCount程序。
启动进入IDEA,如图A-20所示,新建一个项目。
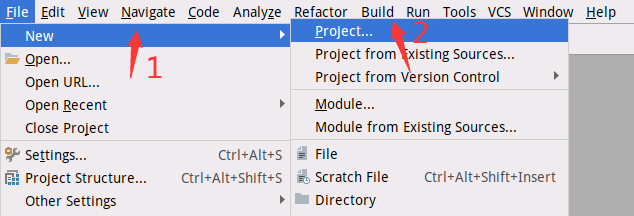
图A-20 创建项目
执行如图A-21所示的操作。设置项目的Name为FlinkWordCount。

图A-21 创建Maven项目
这时生成的项目目录结构如图A-22所示。如果“src/main/”目录下不存在java目录,可以手动创建一个java目录,创建方法是,在main目录上单击鼠标右键,在弹出的菜单中,选择“New->Directory”,然后输入目录名称java,再按回车即可完成创建。
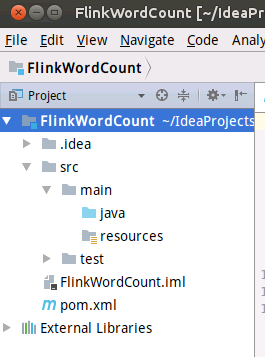
图A-22 项目结构
打开pom.xml文件,输入如下内容:
<project>
  <groupId>cn.edu.xmu.dblab</groupId>
  <artifactId>wordcount</artifactId>
  <modelVersion>4.0.0</modelVersion>
  <name>WordCount</name>
  <packaging>jar</packaging>
  <version>1.0</version>
  <repositories>
    <repository>
      <id>alimaven</id>
      <name>aliyun maven</name>
      <url>https://maven.aliyun.com/nexus/content/groups/public/</url>
    </repository>
  </repositories>
  <dependencies>
    <dependency>
      <groupId>org.apache.flink</groupId>
      <artifactId>flink-streaming-java</artifactId>
      <version>1.16.2</version>
    </dependency>
    <dependency>
      <groupId>org.apache.flink</groupId>
      <artifactId>flink-clients</artifactId>
      <version>1.16.2</version>
    </dependency>
    <dependency>
      <groupId>org.apache.flink</groupId>
      <artifactId>flink-java</artifactId>
      <version>1.16.2</version>
    </dependency>
  </dependencies>
</project>
如图A-23所示,创建Package。
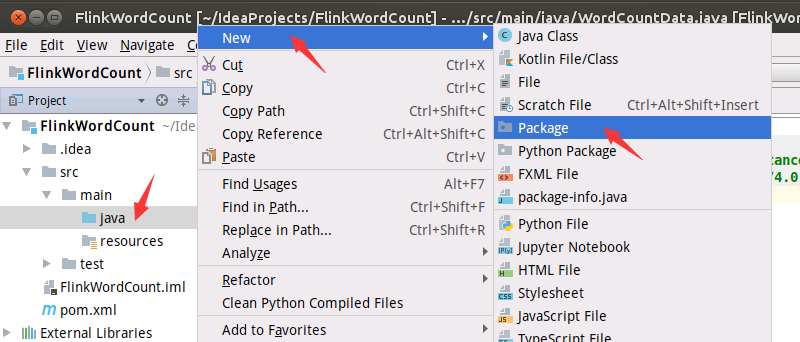
图A-23 创建Package
如图A-24所示,输入Package的名称为“cn.edu.xmu”。
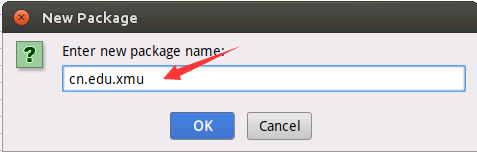
图A-24 设置Package的名称
如图A-25所示,新建一个Java Class文件。
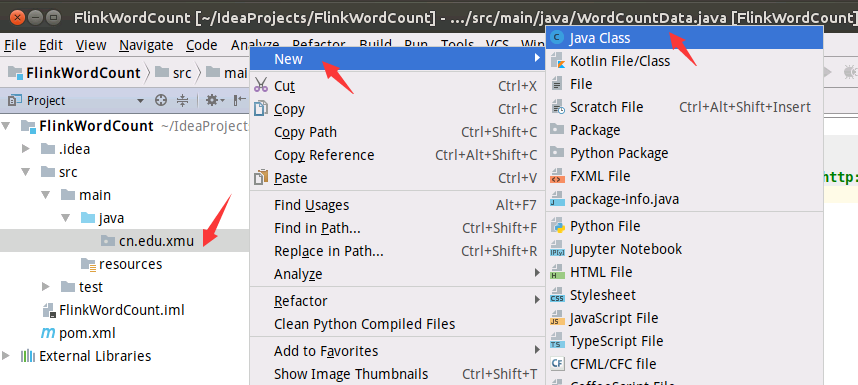
图A-25 新建Java Class文件
如图A-26所示,输入文件名称WordCountData。
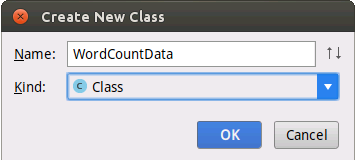
图A-26 输入类的名称
WordCountData.java用于提供原始数据,其内容如下:
package cn.edu.xmu;
import org.apache.flink.streaming.api.datastream.DataStream;
import org.apache.flink.streaming.api.environment.StreamExecutionEnvironment;

public class WordCountData {
    public static final String[] WORDS=new String[]{"To be, or not to be,--that is the question:--", "Whether \'tis nobler in the mind to suffer", "The slings and arrows of outrageous fortune", "Or to take arms against a sea of troubles,", "And by opposing end them?--To die,--to sleep,--", "No more; and by a sleep to say we end", "The heartache, and the thousand natural shocks", "That flesh is heir to,--\'tis a consummation", "Devoutly to be wish\'d. To die,--to sleep;--", "To sleep! perchance to dream:--ay, there\'s the rub;", "For in that sleep of death what dreams may come,", "When we have shuffled off this mortal coil,", "Must give us pause: there\'s the respect", "That makes calamity of so long life;", "For who would bear the whips and scorns of time,", "The oppressor\'s wrong, the proud man\'s contumely,", "The pangs of despis\'d love, the law\'s delay,", "The insolence of office, and the spurns", "That patient merit of the unworthy takes,", "When he himself might his quietus make", "With a bare bodkin? who would these fardels bear,", "To grunt and sweat under a weary life,", "But that the dread of something after death,--", "The undiscover\'d country, from whose bourn", "No traveller returns,--puzzles the will,", "And makes us rather bear those ills we have", "Than fly to others that we know not of?", "Thus conscience does make cowards of us all;", "And thus the native hue of resolution", "Is sicklied o\'er with the pale cast of thought;", "And enterprises of great pith and moment,", "With this regard, their currents turn awry,", "And lose the name of action.--Soft you now!", "The fair Ophelia!--Nymph, in thy orisons", "Be all my sins remember\'d."};
    public WordCountData() {
    }
    public static DataStream<String> getDefaultTextLineDataStream(StreamExecutionEnvironment senv){
        return senv.fromElements(WORDS);
    }
}按照刚才同样的操作,创建第2个文件WordCountTokenizer.java。WordCountTokenizer.java用于切分句子,其内容如下:
package cn.edu.xmu;
import org.apache.flink.api.common.functions.FlatMapFunction;
import org.apache.flink.api.java.tuple.Tuple2;
import org.apache.flink.util.Collector;

public class WordCountTokenizer implements FlatMapFunction<String, Tuple2<String,Integer>>{
    public WordCountTokenizer(){}
    public void flatMap(String value, Collector<Tuple2<String, Integer>> out) throws Exception {
        String[] tokens = value.toLowerCase().split("\\W+");
        int len = tokens.length;
        for(int i = 0; i<len;i++){
            String tmp = tokens[i];
            if(tmp.length()>0){
                out.collect(new Tuple2<String, Integer>(tmp,Integer.valueOf(1)));
            }
        }
    }
}按照刚才同样的操作,创建第3个文件WordCount.java。WordCount.java提供主函数,其内容如下:
package cn.edu.xmu;
import org.apache.flink.api.common.RuntimeExecutionMode;
import org.apache.flink.api.java.tuple.Tuple2;
import org.apache.flink.streaming.api.datastream.DataStream;
import org.apache.flink.streaming.api.environment.StreamExecutionEnvironment;

public class WordCount {
    public WordCount(){}
    public static void main(String[] args) throws Exception {
        StreamExecutionEnvironment senv = StreamExecutionEnvironment.getExecutionEnvironment();
        senv.setRuntimeMode(RuntimeExecutionMode.BATCH);
        Object text;
        text = WordCountData.getDefaultTextLineDataStream(senv);
        DataStream<Tuple2<String, Integer>> counts = ((DataStream<String>)text).flatMap(new WordCountTokenizer())
                .keyBy(0)
                .sum(1);
        counts.print();
        senv.execute();
    }
}
三个代码文件创建好以后的效果,如图A-27所示。
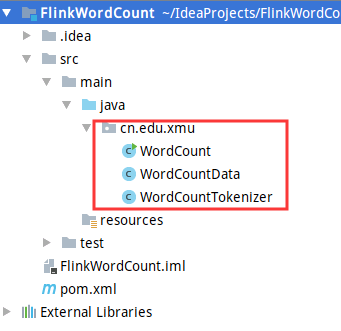
图A-27 项目目录树
如图A-28所示,在左侧目录树的pom.xml文件上单击鼠标右键,在弹出的菜单中选择“Maven”,再在弹出的菜单中选择“Generate Sources and Update Folders”。
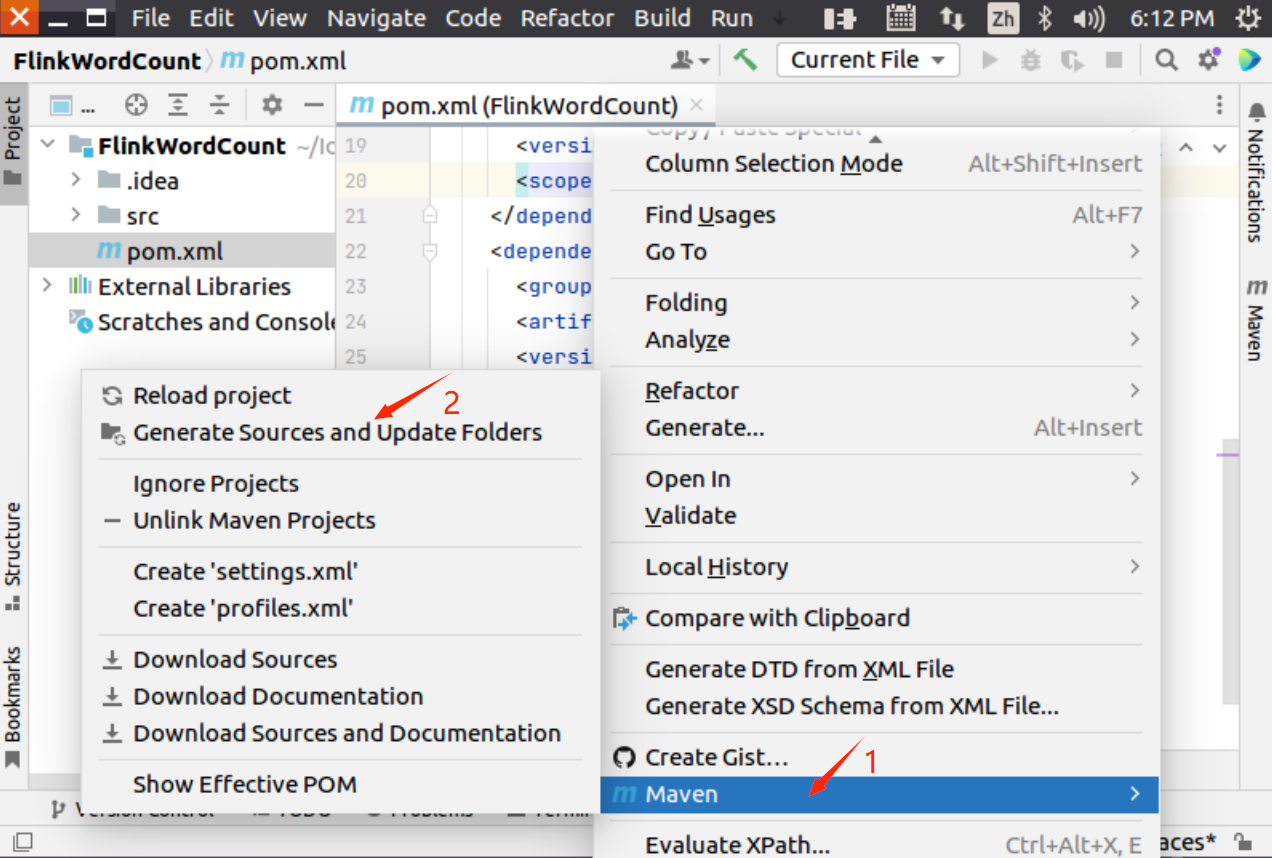
图A-28 Generate Sources and Update Folders操作
如图A-29所示,在左侧目录树的pom.xml文件上单击鼠标右键,在弹出的菜单中选择“Maven”,再在弹出的菜单中选择“Reload project”。
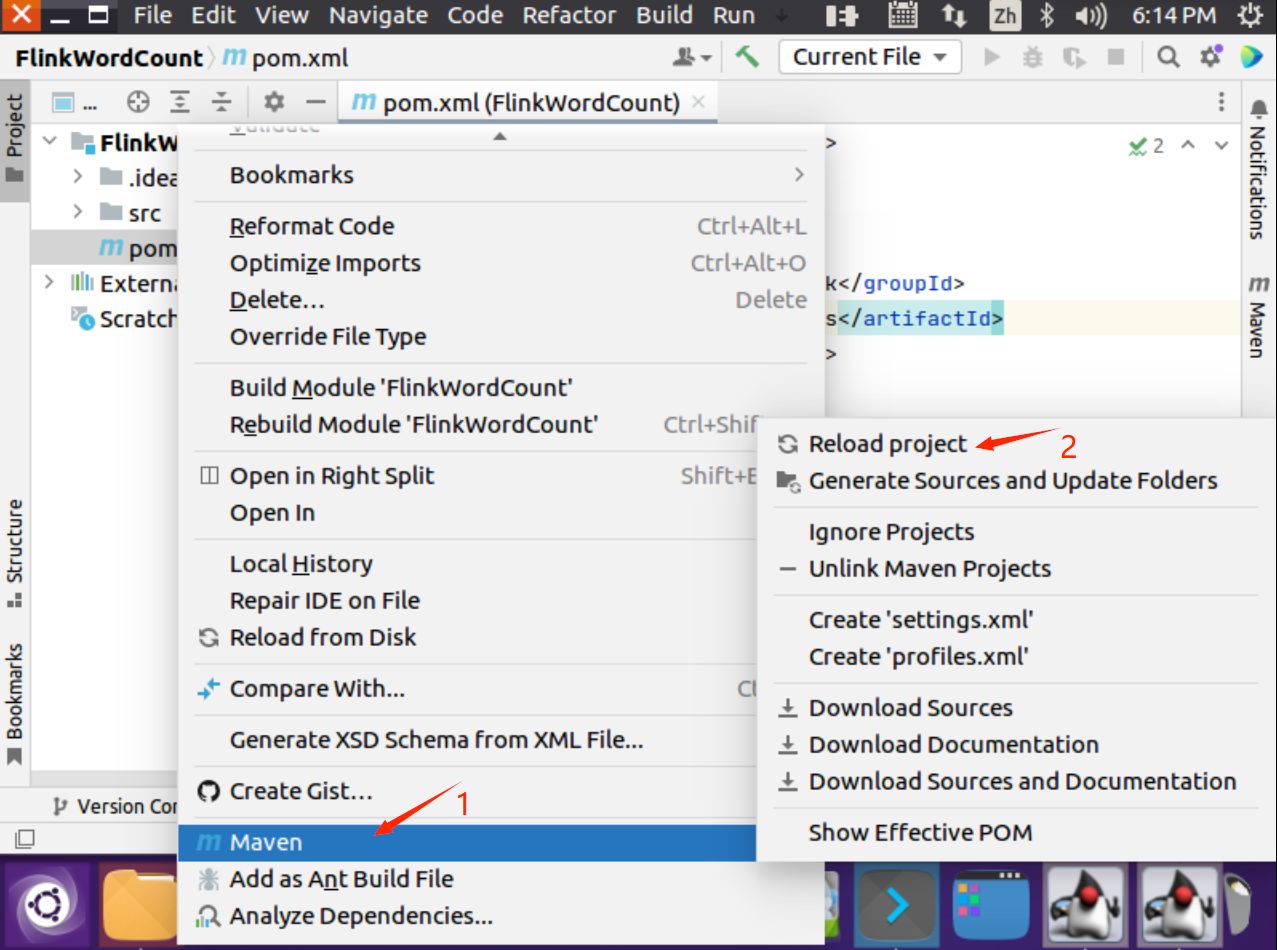
图A-29 Reimport操作
如图A-30所示,执行编译。
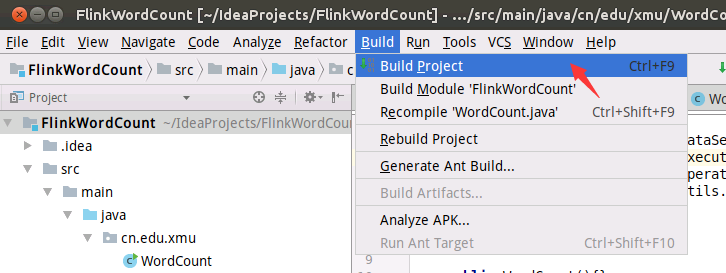
图A-30 执行编译
如图A-31所示,打开WordCount.java代码文件,在这个代码文件的代码区域,鼠标右键单击,弹出菜单中选中“Run WordCount.main()”。
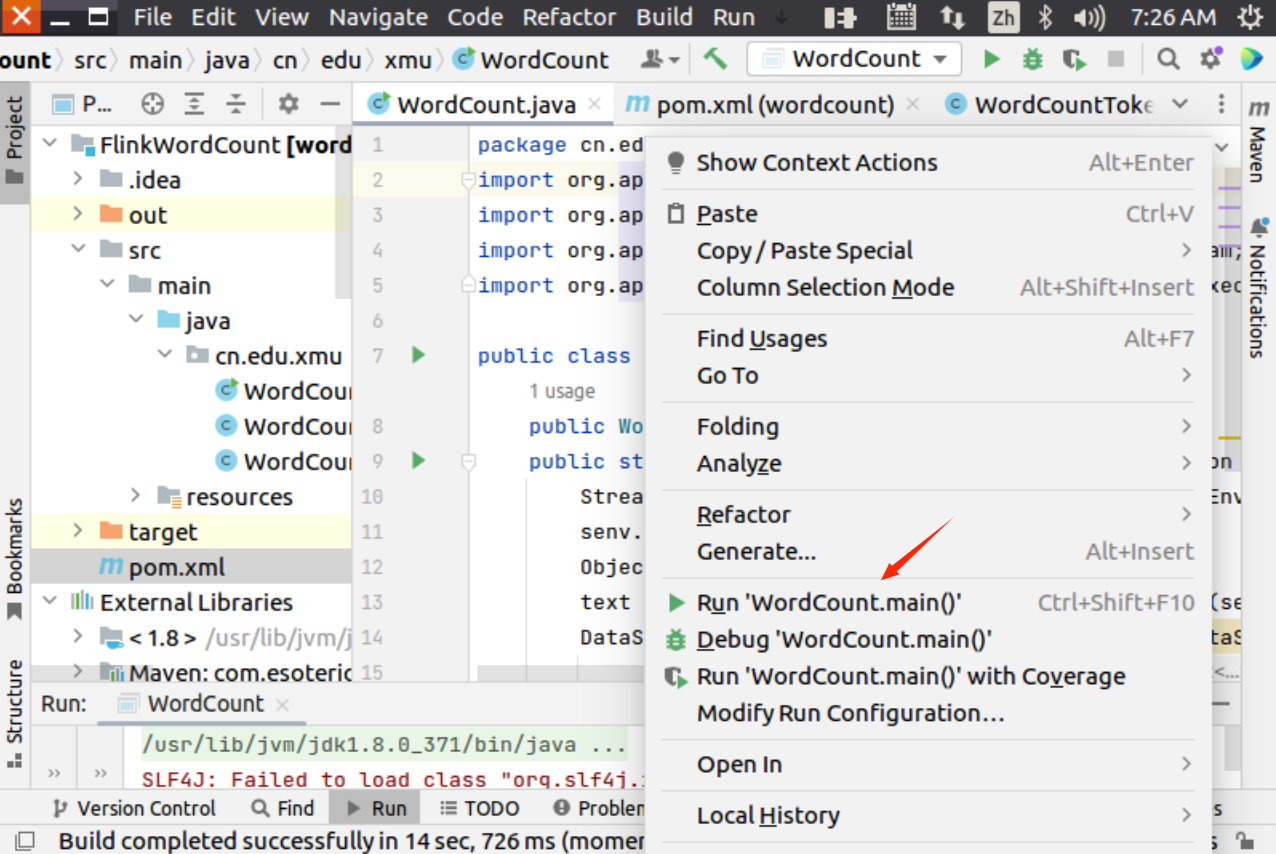
图A-31 运行代码
如图A-32所示,执行成功以后,可以看到词频统计结果。
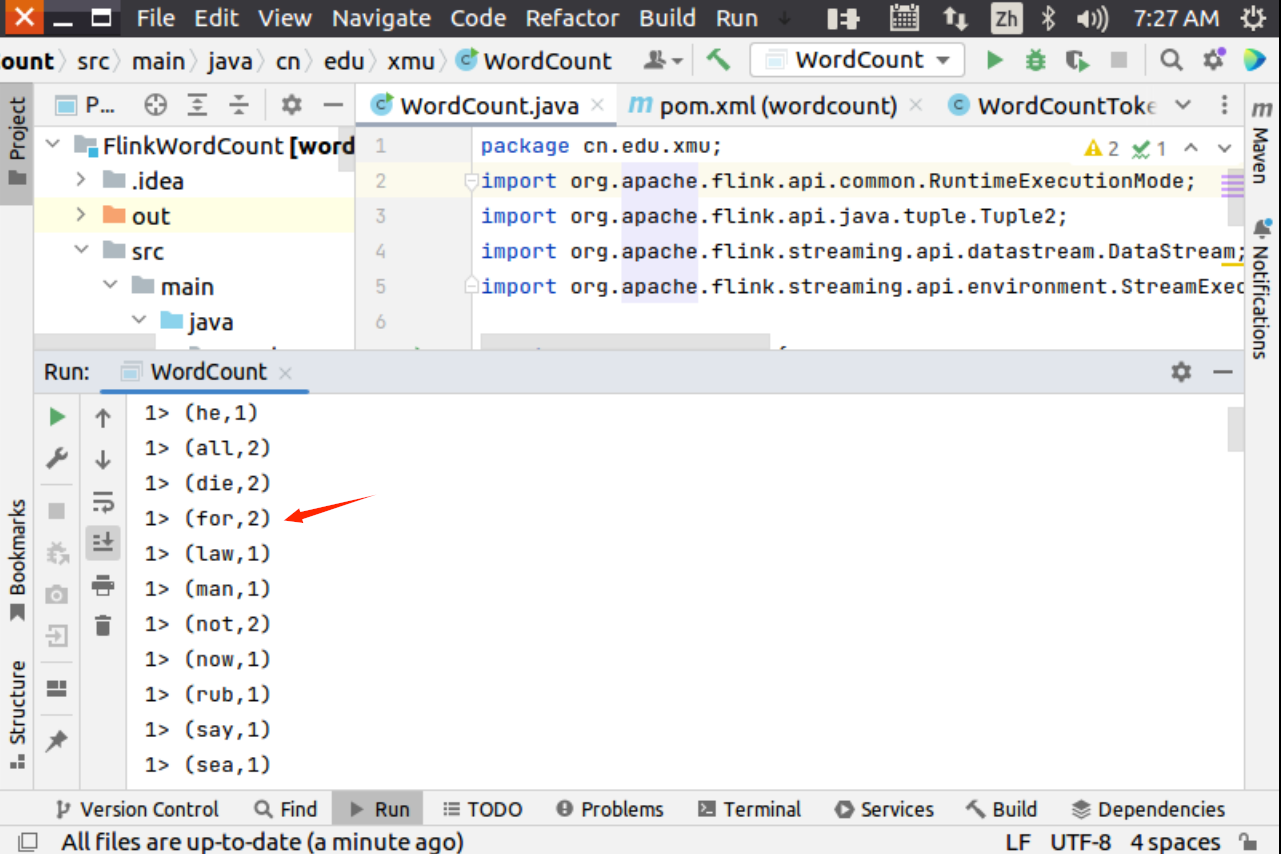
图A-32 程序执行结果
下面要把代码进行编译打包,打包成jar包。为此,需要做一些准备工作。
如图A-33所示,进入设置界面。
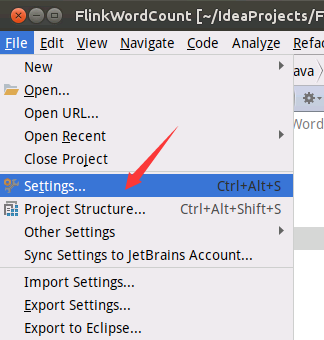
图A-33 打开设置界面
如图A-34所示进行设置。
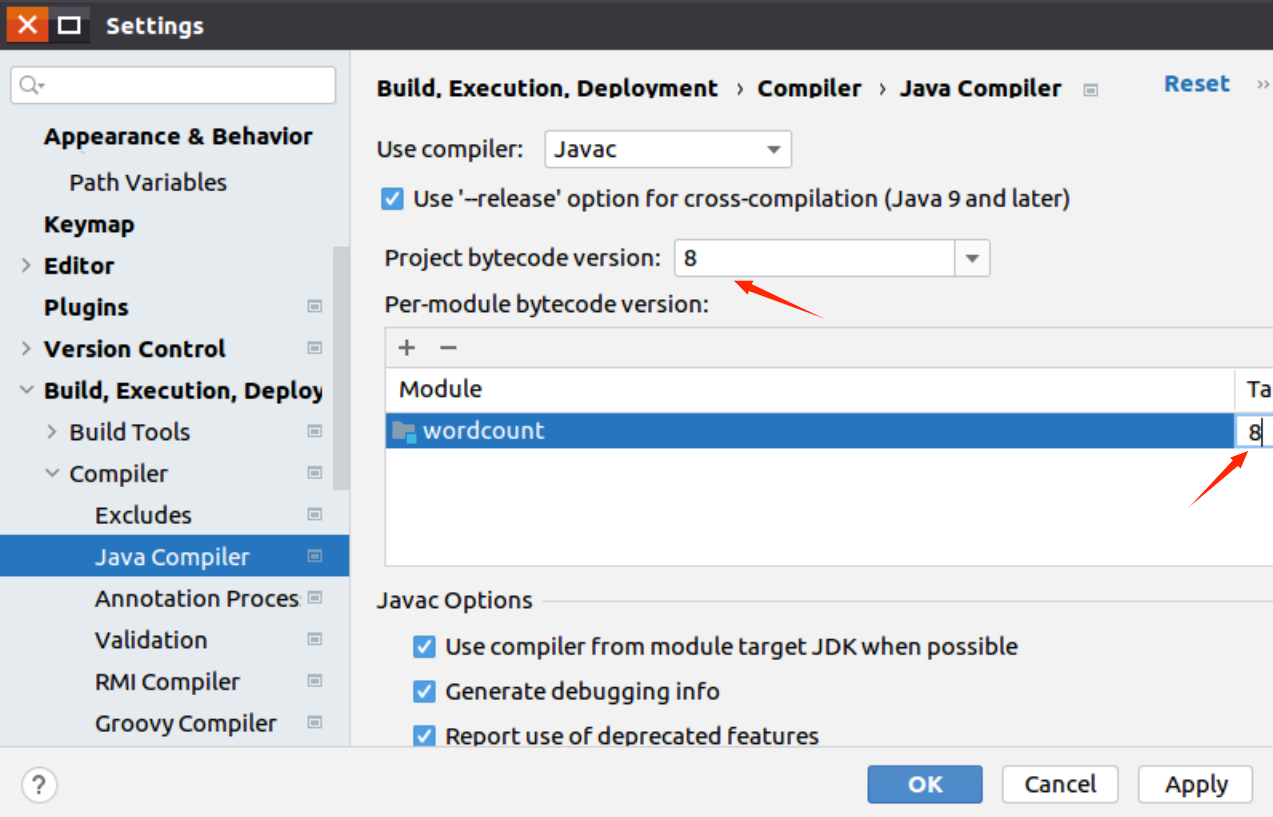
图A-34 设置Java Compiler
如图A-35所示进入Project Structure界面。
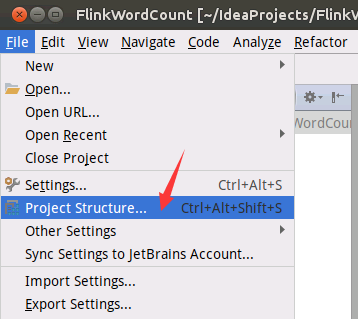
图A-35 进入Project Structure界面
按照如图A-36所示进行设置。

图A-36 设置项目信息
按照如图A-37所示进行设置。

图A-37 设置Language level
按照如图A-38所示进行设置。

图A-38 设置Project SDK
按照如图A-39所示进行设置。

图A-39 设置Artifacts
按照如图A-40所示进行设置。

图A-40 设置Main Class
按照如图A-41所示进行设置。在搜索框中输入“WordCount”就会自动搜索到主类,然后在搜索到的结果条上双击鼠标。
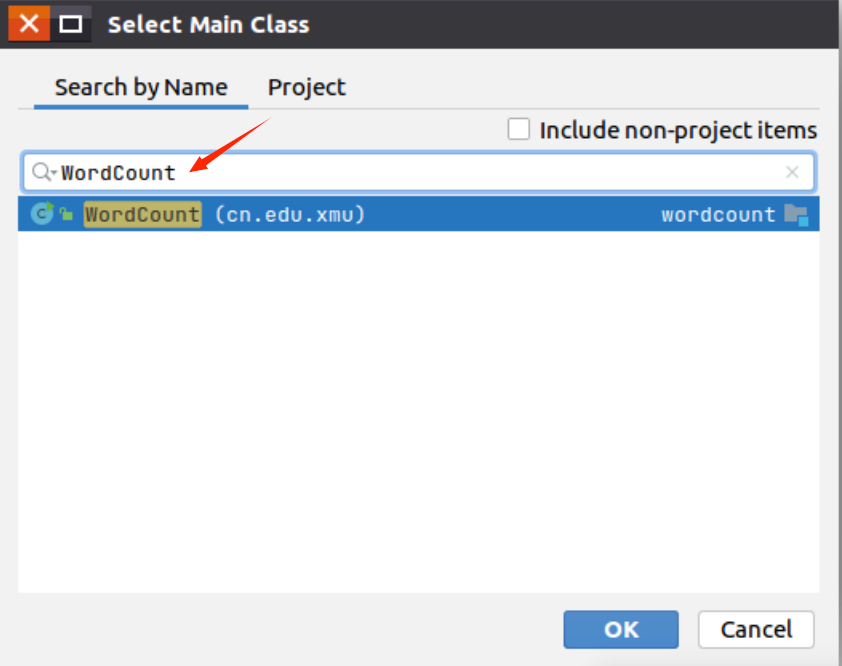
图A-41 选择Main Class
按照如图A-42所示设置META-INF目录,然后点击“OK”按钮。
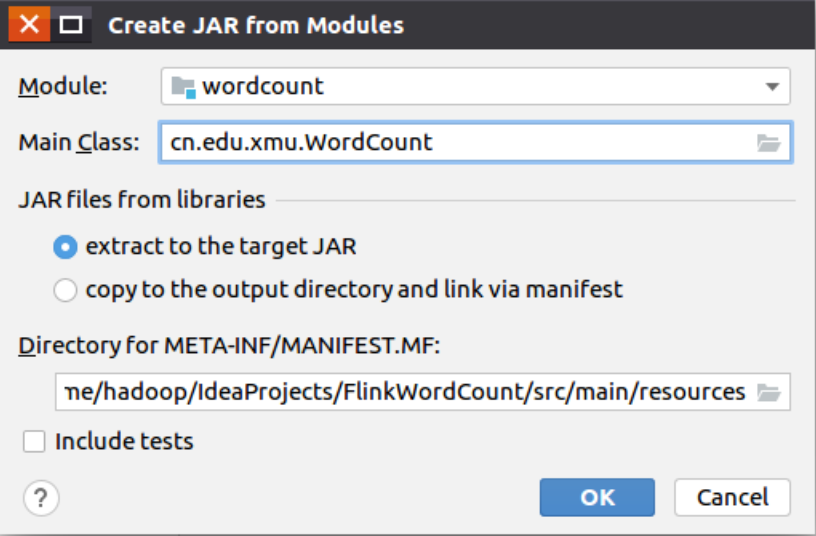
图A-42 设置META-INF目录
按照如图A-43所示进行设置。
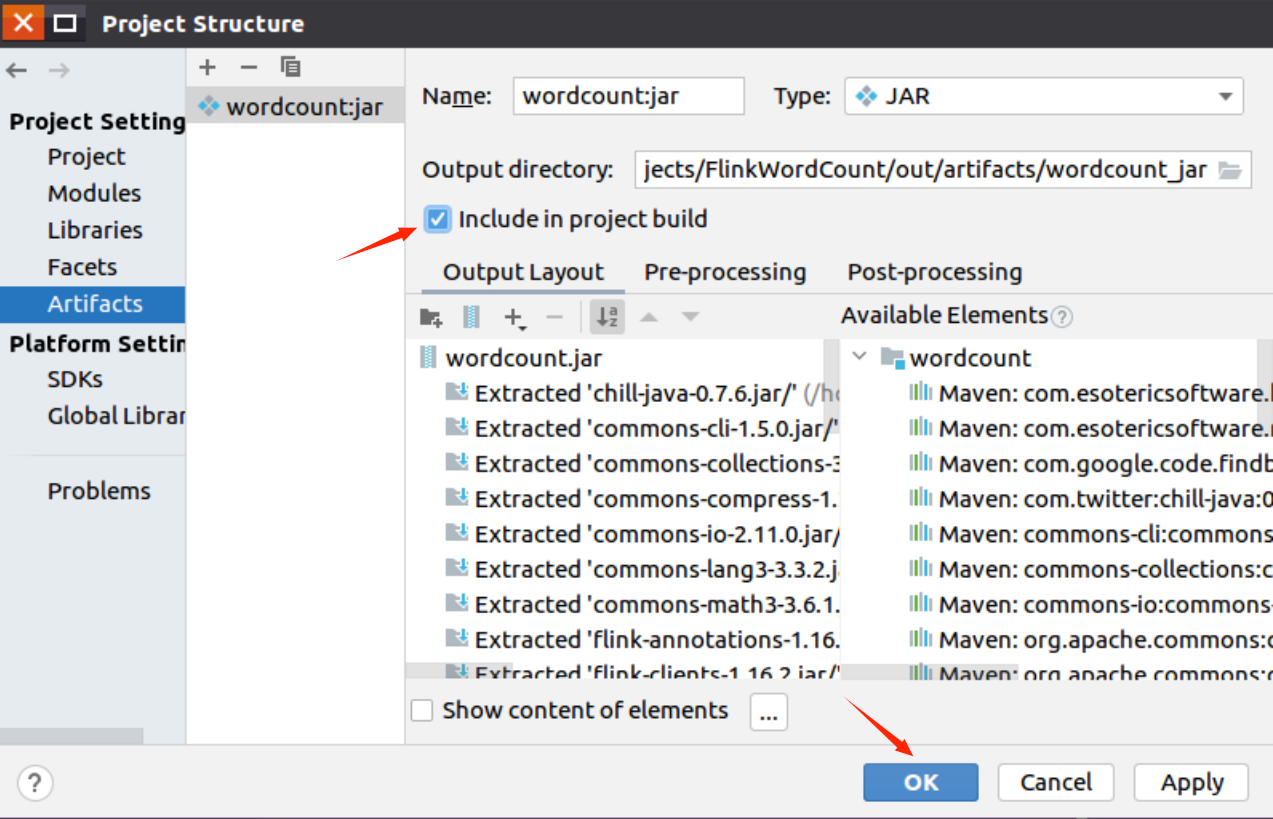
图A-43 设置项目结构
如图A-44所示,进入编译打包菜单。
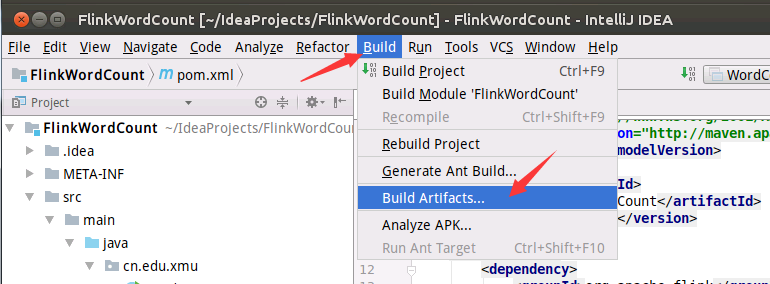
图A-44 编译打包菜单
如图A-45所示,开始编译打包。

图A-45 开始编译打包
如图A-46所示,编译打包成功以后,可以看到生成的wordcount.jar文件。
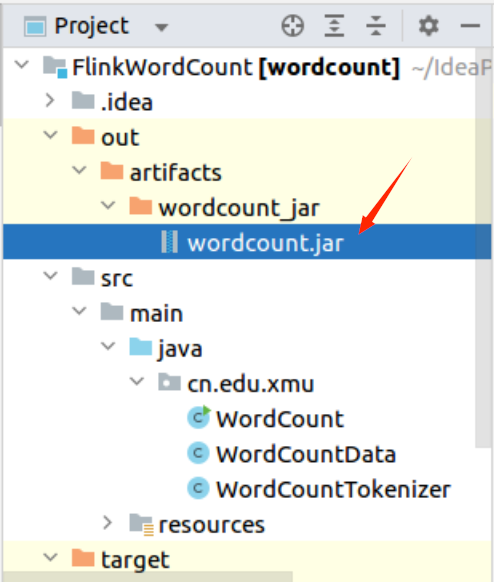
图A-46 编译打包生成的wordcount.jar文件
最后,到Flink中运行wordcount.jar。这里一定要注意,要确认已经开启Flink系统。运行的命令和执行结果如图A-47所示。

图A-47 程序运行结果
这时可以到浏览器中查看结果。在Linux系统中打开一个浏览器,在里面输入“http://localhost:8081”,进入Flink的WEB管理页面,然后,点击左侧的“Task Managers”,会弹出右边的新页面,在页面中点击“Path,ID”下面的链接(如图A-48所示)。

图A-48 Flink的WEB管理页面
然后,会出现如图A-49所示的新页面,在这个页面中,点击“Stdout”选项卡,就可以看到词频统计结果了。
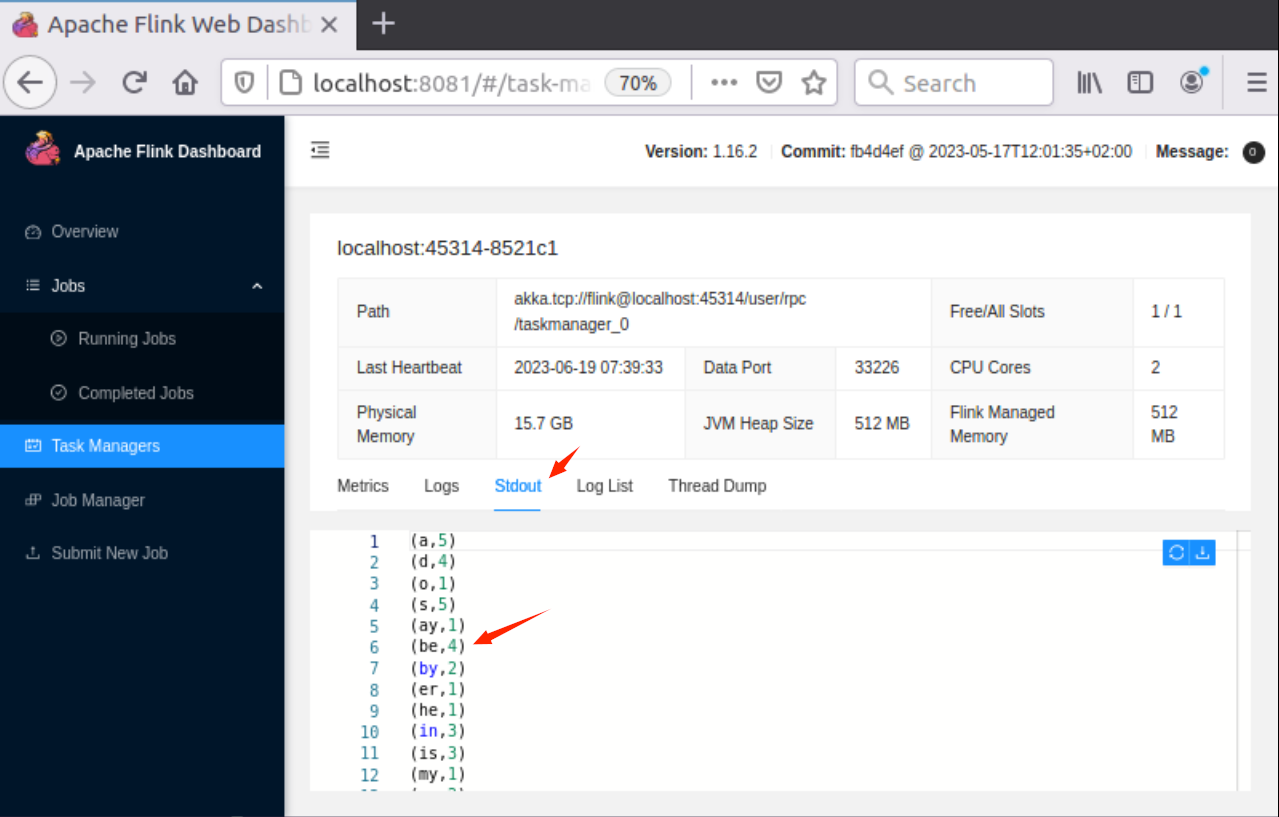
图A-49 词频统计结果